
This older tutorial shows a basic VB.NET desktop integration. The examples below verify online at registration and startup. For cached offline use, follow the offline verification guide.
If you want to jump straight into the code, please check out the key verification tutorial.
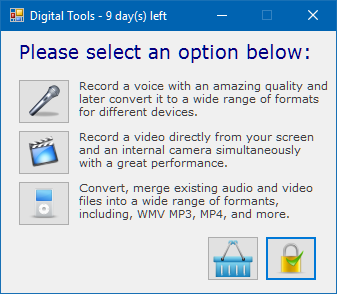
The example has three features (voice, audio, and converter). Features 1, 2, and 3 enable their buttons. Feature 4 marks a time-limited license; without it, this example treats the license as perpetual.
Cryptolens .NET Client
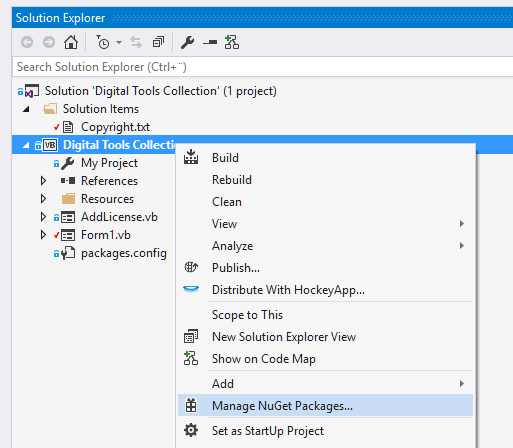
Now we can start using all of the power of the Cryptolens Client API. The easiest way to get Cryptolens Client API is through NuGet in Visual Studio.- Go to the solution explorer and right click on the project (not the solution).
- Click on
Manage NuGet Packages...
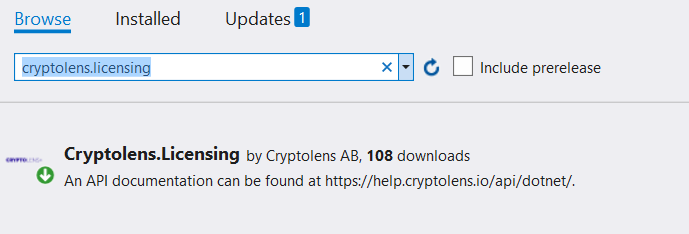
Cryptolens.Licensing into the Browse tab, select SKM Client API and install it.
Adding Code
We almost have all the pieces in place to get a working licensing solution. We will cover the code in this section and look at how to retrieve access tokens and public key (RSA) later. Our application will have two places where we will need to insert the code:- During license key registration - the first time the user inserts a license key
- During application start - to check for an existing license on launch
Note, you can find more detailed examples of .NET here and other environments here. Please don’t hesitate to contact us should you have any questions.Add these imports at the top of your main form’s code file:
NoLicense disables the three feature buttons until a license has been verified.
3349. Replace it with your product ID in both the request and the response check. You will also need an access token with the Activate permission and your RSA public key; the sections below explain where to find them. For node-locked licensing, set Maximum Number of Machines greater than 0. This example does not use floating seats.
License Key Registration
Put this code in your license-entry button’sClick handler on the main form. TextBox1 contains the entered license key, and Button1, Button2, and Button4 are the feature buttons in the example. Replace these control names if your form uses others.
SaveToFile() saves the signed response to licensekey.skm, ready for the next startup. You can pass a different path to both SaveToFile and LoadFromFile if needed.
Application Start
Put this code in the same form’sLoad handler. We load the saved file to find the license key, then activate it again to get any changes made since the last run.
Button1_Click with:
Access Tokens
In all of the code examples, you will see variables such astoken or auth. They refer to an access token.
The idea behind access tokens is to allow you to:
- identify yourself with Cryptolens (authentication) - let Cryptolens know that you are you
- give your application only the permissions it needs (authorization) - for example, access to particular methods or products
Creating a new Access Token
In order to create an access token with the permission required by the previous example:- Go to ‘Your account name’ (right corner) > ‘Access Token’.
- Click on ‘Create new Access Token’. You will now be on this page.
- Enter a name, such as “ActivateToken”.
- Select the Activate permission under License Key. Add the Deactivate permission if your application releases devices and the Get Key permission if it calls GetKey.
- Select the ‘Product Lock’ to be the name of your application.
- Leave Key Lock and Feature Lock at
0for this starting configuration, then select Create Access Token. - Copy and securely store the access token when it is shown, then replace the example’s access token with yours. The value cannot be retrieved later.
Example
You can find an example configuration in Application activation and device release.Public Key
In many cases, you will store license key data locally on your customers’ devices, partly to allow your customers to use the application offline. At the same time, you don’t want them to be able to modify the license key data (for example, the features they are entitled to and the expiration date). Therefore, Cryptolens will sign the license key (if you explicitly tell it to do so) with your private key. The public key will allow your application to check that the license key file hasn’t been modified since it was signed by Cryptolens. The public key won’t allow them to re-sign the data, only to validate it.Finding your Public Key
In order to find your unique public key:- Sign in to the dashboard QuickStart page and find Credentials → RSA Public Key.
- Copy the entire public key, including the XML tags, into the
RSAPubKeyvariable in both examples.
Create a Key
We’re now ready to test the code using your account.- Select the product from the list.
- Click on ‘Create a new Key’.
- Check features 1, 2, and 3 for the functionality to enable.
- For this example’s time-limited policy, check feature 4 and set the expiry date.